Another round of UV maps to show off to the world. Who would have thought I'd be here already I guess I'm still in a little disbelief here. I am still working hard on the Barnabas model so hopefully the day for delivery (Weds) should still be okay. I plan to work solidly until I have him complete so we can get moving with other more pressing matters. When the minor project hand in is going on I will probably be MIA on the day, sleeping off this unit a little. I just found out we have another briefing on the Friday again I will see how I am doing. I don't want to be a zombie there ha-ha.
Anyway this post will draw a close to Young Barnabas's UV maps which are totally sorted on my end. If I have time I will try to drape them with a proper texture to do a nice character render. If not just know that it is there in spirit. What I don't get submitted for this unit I will submit for the Major project. I have rigging, a dissertation and a texture passes to sort out following this unit but they shouldn't be a major hitch. I have also just seen the timetable for the major unit its mostly self directed study I guess here we are told to go forth and "be amazing" as Phil would say...
Anyway lets take a look at the UV Maps for Young Barnabas woop woop!
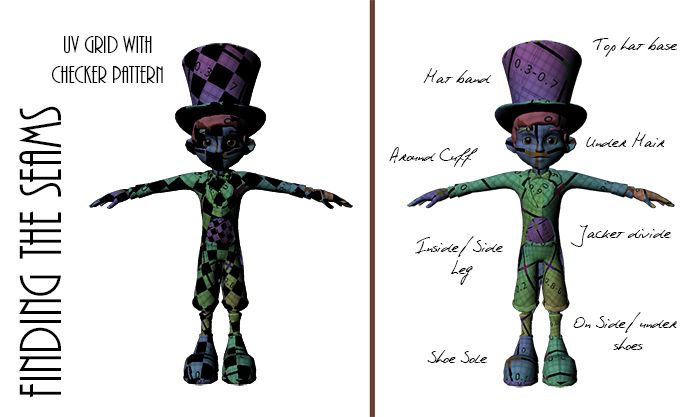
The image above shows my process for testing the uv quality of my model. There is a standard checker matt which lots of people use to find little inconsistencies. There is also the UV grid option which does something similar showing seam placement and any and all distortion in the UV map. I like to combine the two usually projecting both on to each other. I find it helps to double up from time to time. The second image is the placement of my seams which is literally identical to Benjamin why? because this model is adapted from his mesh.
The video above shows the ZUV tiles of my UV mapping this is again just another way to check what elements of your UV map reflect their geometry. Its a nice little touch by Pixologic (the inventors of ZBrush) but I like the hurdles. I also like to have any excuse possible to go into ZBrush (a concept which threw me off a little bit for this unit) but I have learnt my lesson. I threw in a little narration over the top of this video as the last one felt a little dry. I felt it was handy to explain my actions a little as I went and did them.
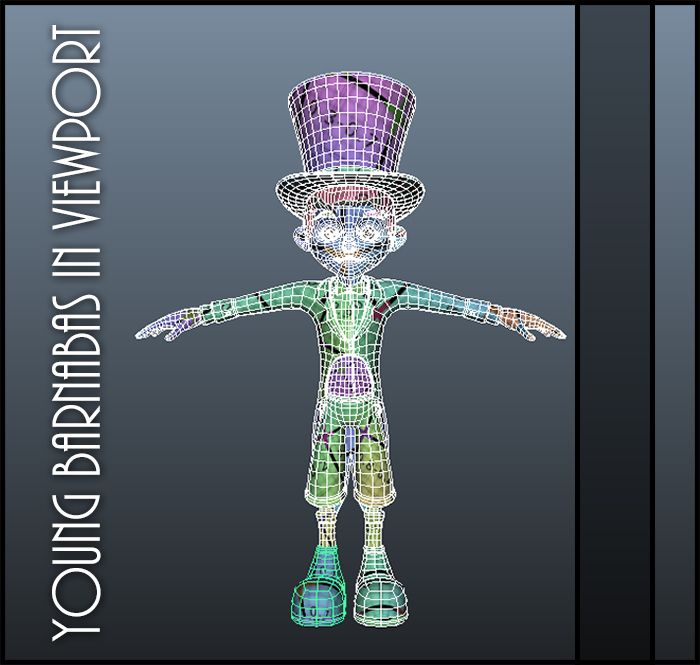
The image above shows the flow of my geometry with the uv map and seam placement. I usually like to examine it closely when knocking out uv maps. You have to hide the seams on a model the best you can to get the best results. Having a seam can cause distortion in that specific area which is another reason why people do their best to keep them out of sight. I have had many uv maps pull and stretch in areas (my most damning area is the lip). Poly-painting sometimes exacerbates the pulling which is why its always nice to finish painting uvs' in Photoshop.
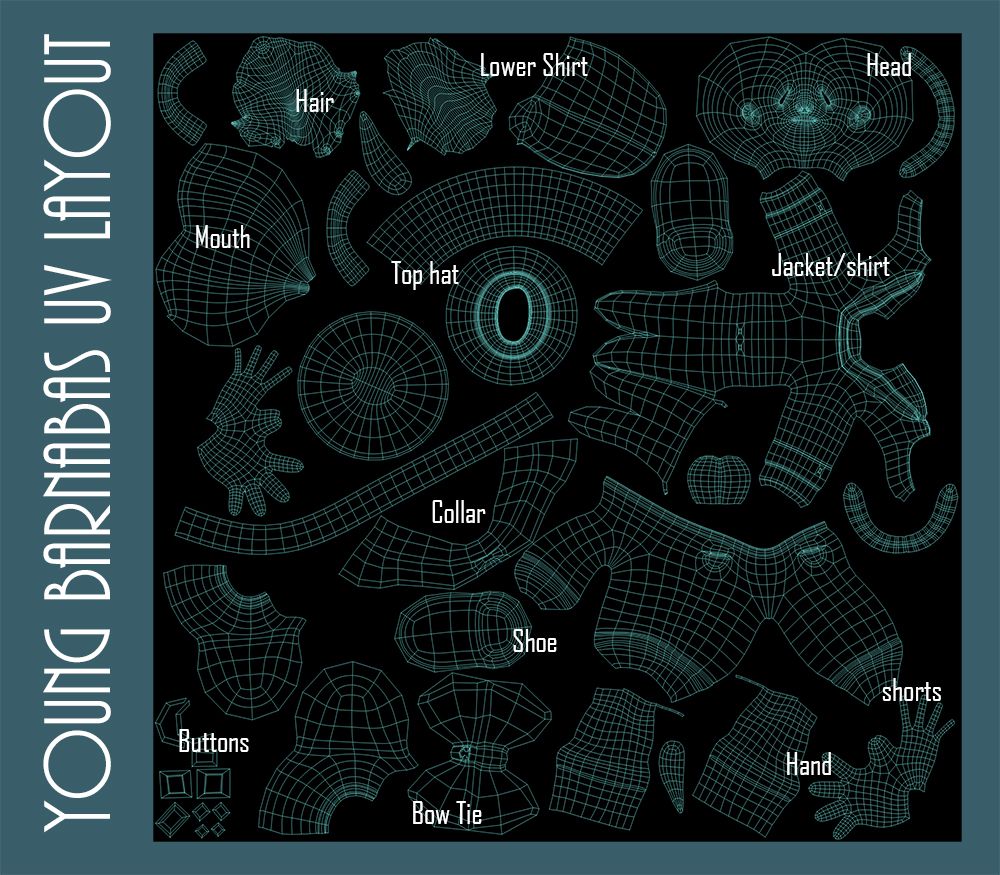
Last but not least is the uv layout itself, I usually mark out what I put where just so people can see the shapes and attribute them to the item they represent. These maps did not have to move much from their original placement (as the Benjamin model). Of course there were elements which were moved around as other geometry got bigger and changed in places. The most difficult area here believe it or not was the head. With Benjamin I had no problems with it the first time round. but it kept overlapping the damn lips this time. Argh lips will be the death of me ha-ha!
Well this is another post to go, hopefully the next one will come quicker then this. Time can fly each time I set up one of these posts but what can I say I have my way of doing things. Barnabas will be the focal point from tomorrow onwards which is why I am trying to get all of this out of the way now. I hopefully will have 3 characters made and UVed for the hand in. Anything extra I will sit down and do a bit of poly-painting and possibly some Weta concept. It all depends on how the modelling goes tomorrow. Wish me luck everyone!
Over & Out,
xXStItChXx


No comments:
Post a Comment