photo home_zps6d4f0910.jpg photo home_zps6d4f0910.jpg photo preproduction_zps0aed42bb.jpg photo production_zps13a97b4d.jpg photo postproduction_zpsdab6d7fd.jpg photo theshort_zps5df2e33b.jpg photo videologs_zps4d0feed2.jpg photo contact_zps45cb7eba.jpg

Saturday, 4 January 2014

Pre-Production: Benjamin Textured Complete

Hello Everyone,

I thought I would get this up to show that I had a go at getting Benjamin textured. Also Lydia's comment on the last post inspired me to get a nice couple of renders of him. Barnabas is coming along, I'm hoping he will be ready by tomorrow or the day after. In the mean time I thought I would get this posted up, I am trying to get everything posted that I can before the deadline next Thursday. I have gone all out this time by even playing with a little lighting for these renders (something everyone knows is my weakness).

If the texturing isn't right or if the ladies want to redo it after this rush is over then they can I don't mind I just wanted to make sure it was covered for the deadline. I may even redo a couple of tonal things with it after the minor hand in. I'm sure if anything is overly wrong I will be schooled either by Alan, Sammy or Chrissie ha-ha. I would just like to say to everyone I did my best here and I hope it is acceptable. I will be focusing on Barnabas solely after this post, if there is time I will see about getting a Weta concept made of both but that's an extra my priority is turnarounds for key characters.

Anyway lets checkout the textured turnarounds for Benjamin Badgersworth
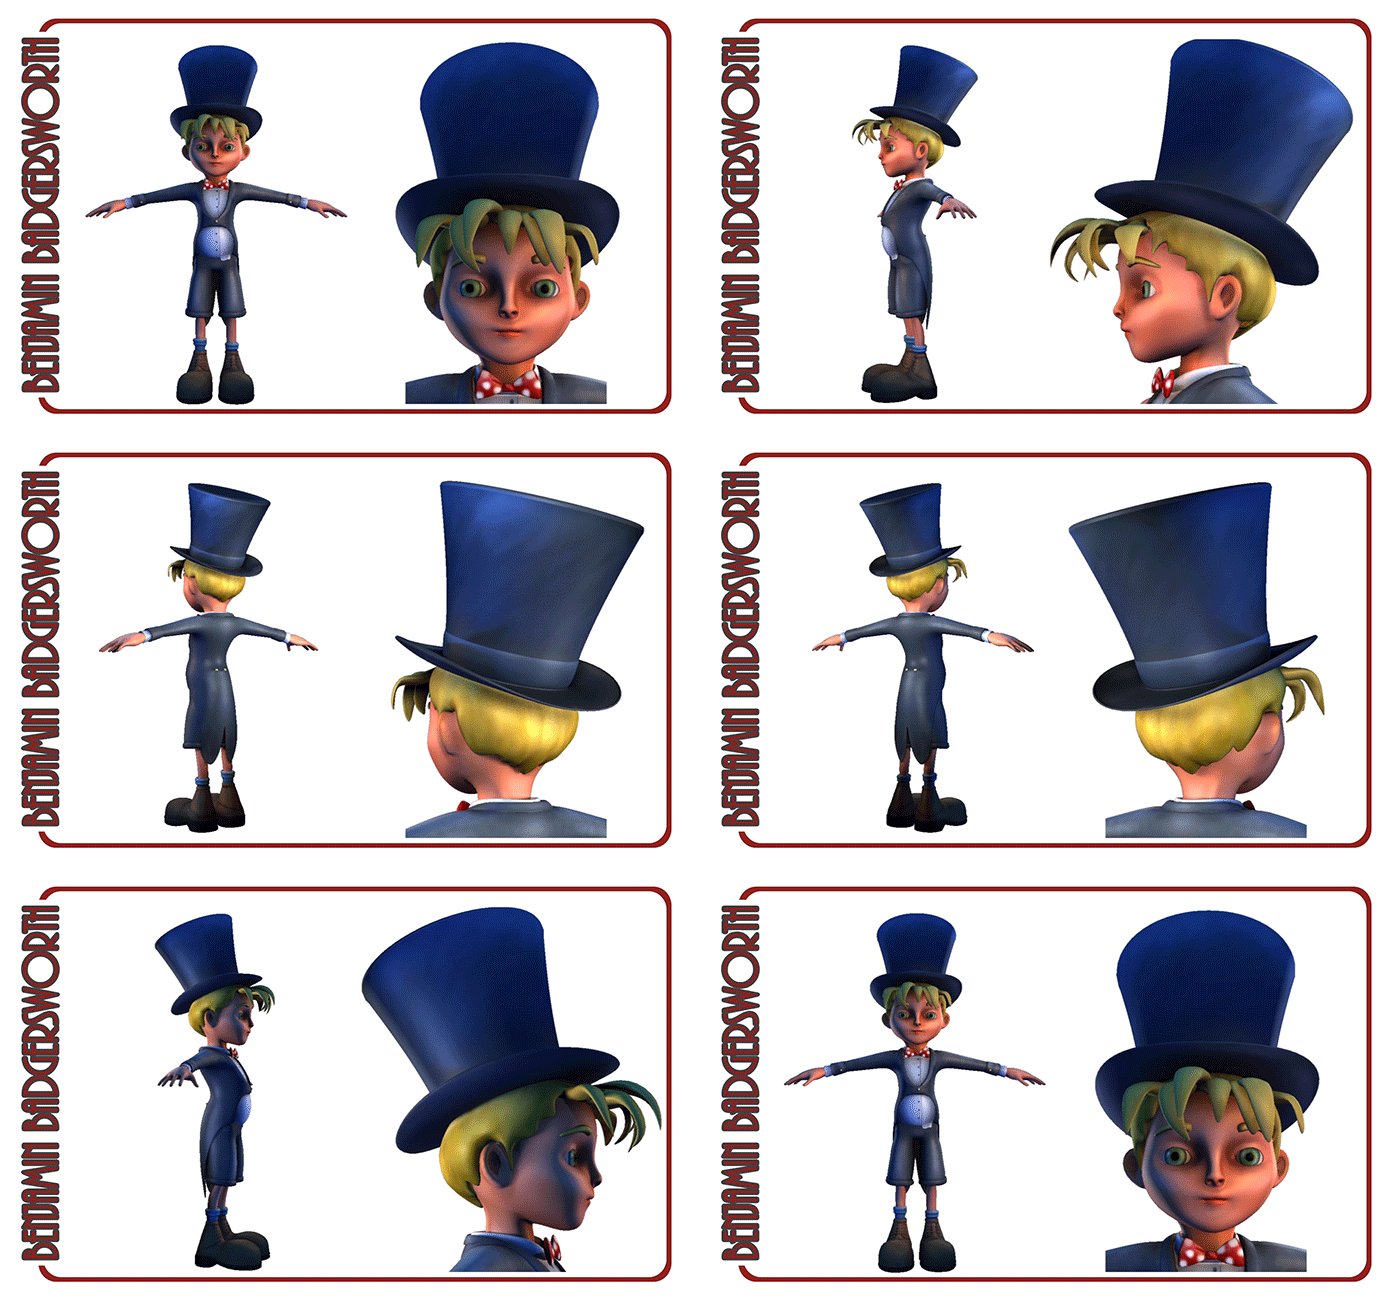
The image above shows the textured Benjamin Badgersworth in turnaround with a couple of light passes. He is a bit shiny in places but I wanted to keep a little shine on the surface of the model. This is easily resolved by changing the material to a lambert. As far as the paintwork goes I decided to try to keep the tones in the texture weaker as our art style is kind of "flat" as it were. Its like I said though if the ladies want to change it they can feel free. I have no doubt that our main decisions where this is concerned will happen when we combine the environment with the characters.

Thursday, 2 January 2014

Pre-Production: Benjamin Model Complete

Hello Everyone,

Well here it is 3 for 3 and hopefully the last Benjamin modelling post. I have to get cracking with Barnabas today to be sure to get it done for next week. I have added everything to this model including a mouth box. The UV maps are also pretty tight and I'm really happy that I got to adjust the hair one last time because it was annoying me how flat his hair was. The problem with Benjamin having puffy hair is the top hat. Without changing its shape it makes fitting his head in a nightmare. I have got it to an acceptable level though... Maybe Alan can guide me later.

I thought I would conclude this model on my end in classical style doing a couple of nice turnarounds in the form of an animated gif. If there is time towards the end I will see if I can get a Weta concept out of him but my priority is getting the models present for the hand in next week. This unit has been a bit of an emotional rollercoaster. There has also been a few other slow moments, things always seem to get difficult over Christmas. I kind of miss my wide family, we have been splintered since the loss of my old man... Hey-ho.

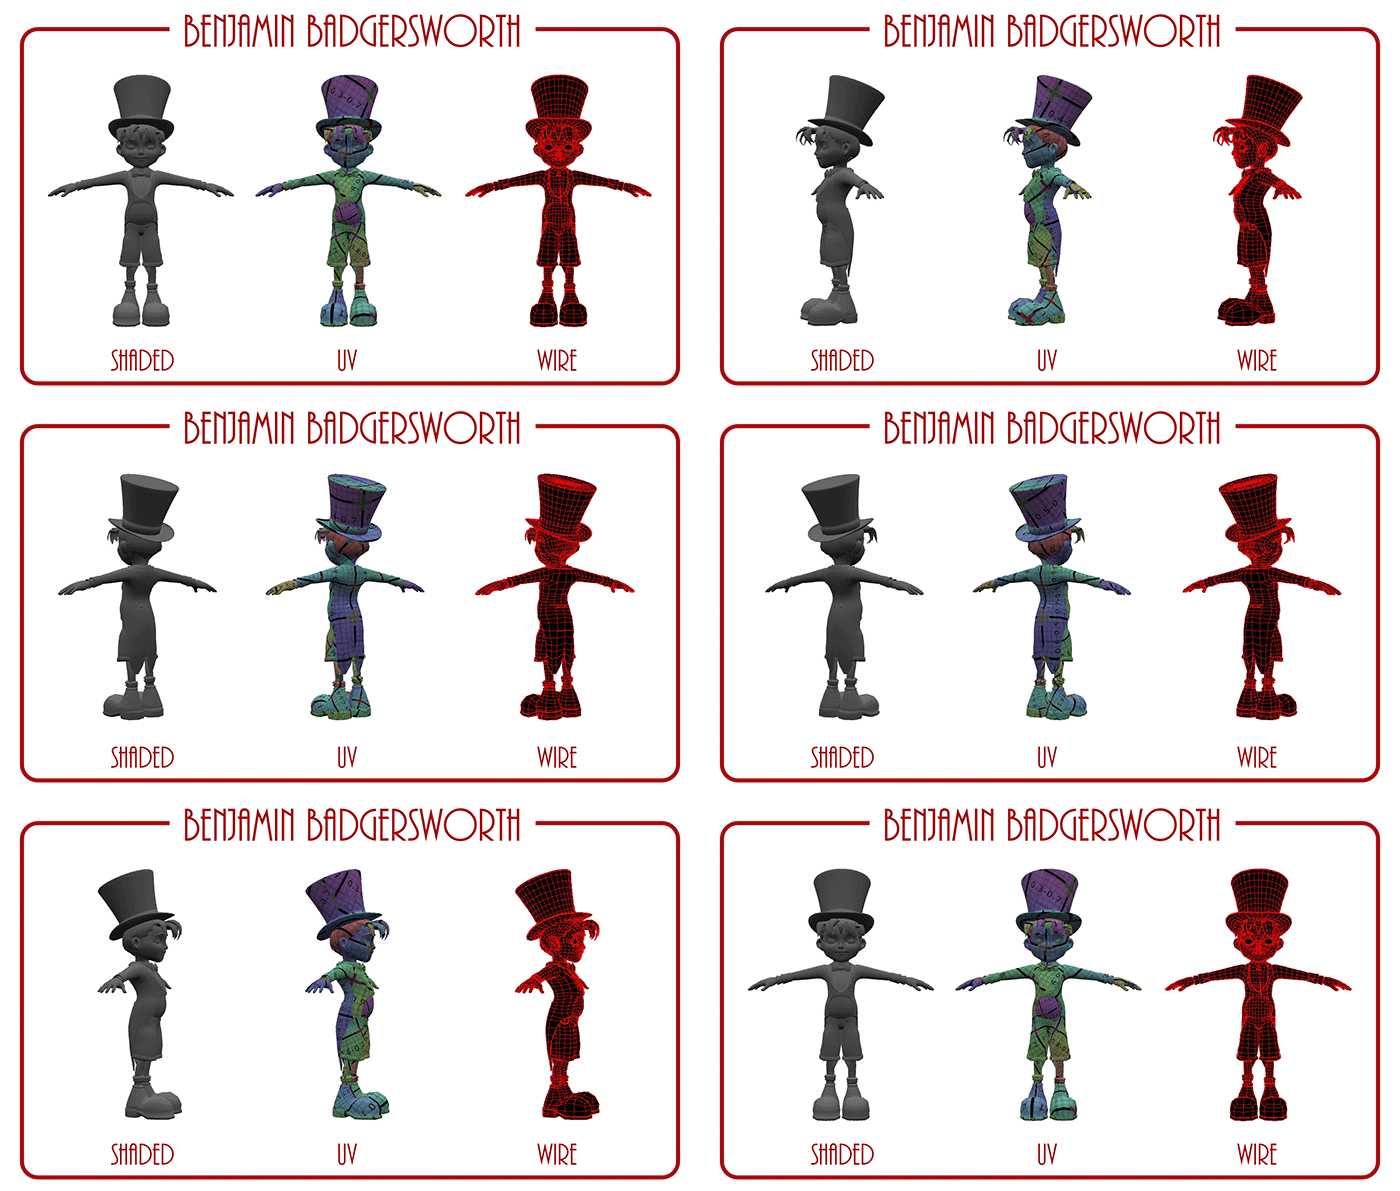
Anyway lets take a look at the Benjamin 3D model turnarounds woop woop!


The image above shows 3 turnaround views of the Benjamin 3D model. The shaded view shows the model in its generic glory. The UV view shows the seem placement and the quality of the UV Mapping. The Wire view shows the flow of the geometry itself as well as the consistency of its edge flow. Its handy to see these views before seeing a model in its entirety, well I feel it does. It allows you to appreciate what the end result is when you consider everything that is going on underneath. I have started making a habit of doing this... it only helps ;)

Wednesday, 1 January 2014

Pre-Production: Benjamin UV Maps

Hello Everyone,

I am back writing another post I am a little annoyed as blogger keeps deciding to delete what I type in here so this is actually my second time doing the same post. The other week I knocked up some UV maps for Benjamin just to see how long it would take me. Luckily enough it only took a day so I'm confident that when I sit down to do Barnabas's we should be okay. I have knocked up another Operation Z video to demonstrate the ZUV's on our little Benjamin model. I'm hoping that having done the UV's will allow the girls just to focus on getting him textured.

We don't have long to get quite a few bits done by next week but I am confident that we will get everything to a high standard. I tried to keep Benjamin relatively low poly so we could go up freely, as Alan said you want to place your detail where you need it. Subdividing will only add to the quality of your detailed areas. The UV mapping is also simpler as you have less points to map especially if you can easily bump it up to increase the quality of your model. Still its been weird getting back into everything, I'm hoping things keep coming thick and fast.

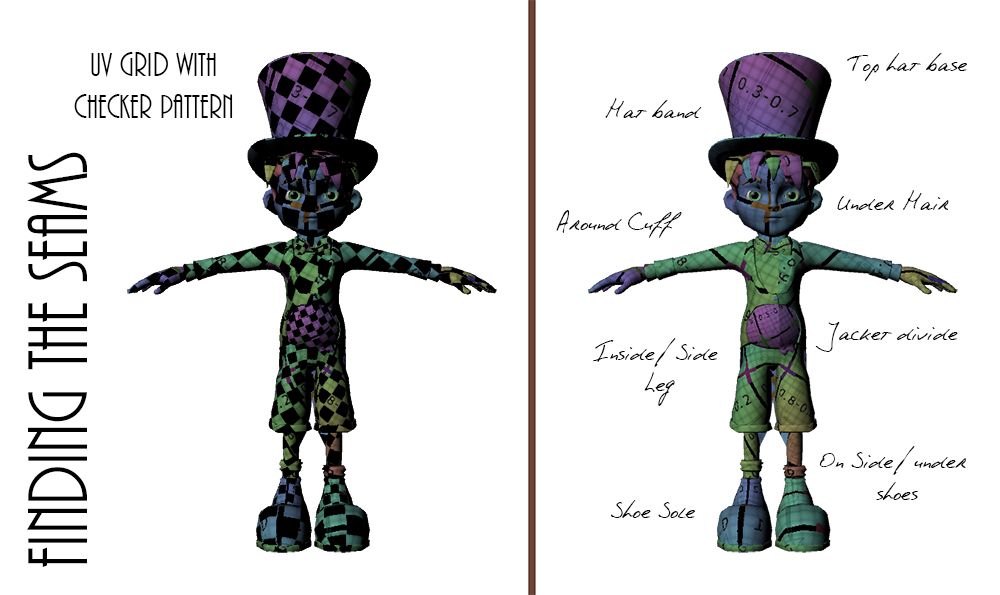
Anyway lets check out the UV Mapping for Benjamin Badgersworth Woop Woop!


One of the things I tend to do when UV mapping is throw some kind of texture on to see if the polygons on the model are working effectively with the texture. I usually throw on either a checker or a UV grid texture which can be found on google. In the image above I have shown my Benjamin model and have identified some of the more obvious front on seams. Myself and my business partner have a little game we play when looking at game models, we like to see if we can identify the locations of the seams... Geeky I know but I guess we don't care.

Pre-Production: Benjamin 2D Turnarounds to 3D

Hello Everyone,

There will be another little flurry of posts tonight as I am attempting to get Benjamin off of my shoulders... this has been a bit of a war. Never the less I haven't been sitting here doing nothing all of Christmas let me tell you that much. There has been a bit of a war brewing since I set off to do a ZBrush feat but it ended up slowing me down, a hard lesson to learn but what can you do. I spent last week getting this model finessed and having just figured out how to get the hair properly mapped I can tell you that I am happy with it now.

I still have Barnabas to go but I think having learnt a few things the hard way I should have him in a day or two for you all to ogle at. In the mean time I thought I would get posting, get the Benjamin model signed off on my end ready for texturing. I have to talk to my creative partners about their involvement in that as I know that was something Sammy implicitly wanted to be involved in. I also created a little video of my battle with this model - moments particularly involving ZBrush. I am happy that I have got one out of the way though...

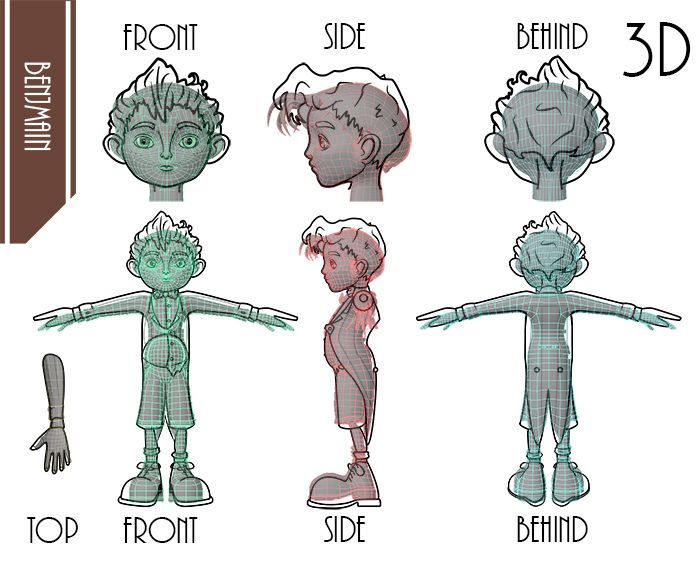
Nothing ventured nothing gained... Anyway it is here now so please enjoy!!

The image above shows the original turnarounds I worked from with the wire of the model projected over the top. I corrected his podginess mostly as Sammy and Chrissie didn't want him to have a beer belly (which was in the original turnaround). I agreed though, it didn't look right on the side profile. The other misguided move was his hair which I made puffy like the turnaround but then the hair kept bleeding through the top of the hat. I ended up having to severely flatten the hair to make the hat rest on the sides of his head. This took a while to sort out...

Pre-Production: Flesh to Final Turnarounds

Hello Everyone,

I have been working my ass off to get everything complete and while I still have a little ways to go I am happy that I am producing something which is acceptable to me. Those of you that know me know exactly how fussy I can be especially when it comes to characters ha-ha. Anyway I have been doing a bit of modelling and stuff but the other day I wanted to finally post up our turnarounds. So I sat down and got all of those to an acceptable level and thought Id do a whole post on them. For those of you keeping score this should be the last bit of 2D work I produce for this project.

Now I have 2 images to post per turnaround because I thought it was valid that we see the whole point of the skeleton turnarounds I knocked up in the prior post so let me explain... If you look closely at the "Stage 2 Adding Flesh To Skeleton" images you will see the skeleton underneath. All I did was essentially draw the flesh over the joints of the skeleton. These acted as my guides for the turnarounds and they are incredibly useful. The word isn't on these but "Stage 3" is essentially adding clothes and creating the turnarounds.. You can see the end results below.

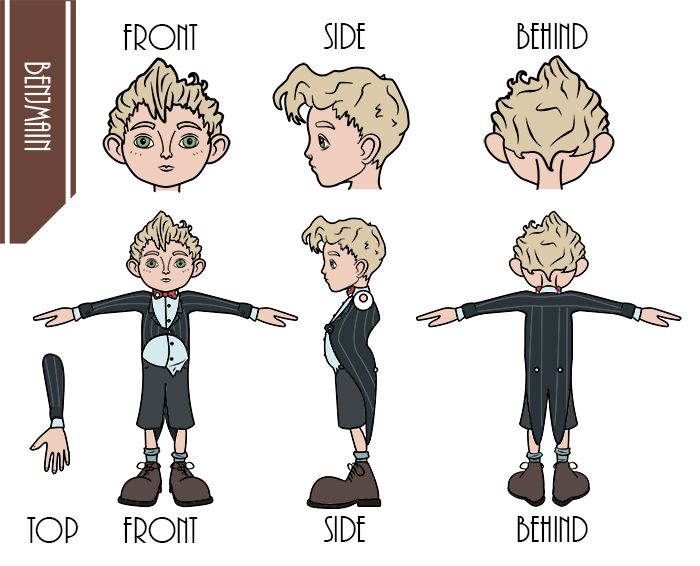
So let me show you these turnarounds so we can finally get to CG.

The image at the very top of this is the underline anatomy of the character Benjamin is slightly podgy but Sammy and Chrissie didn't have an overhanging Belly in mind so I overshot that one. Still they corrected me and I corrected the flaws in the final turnaround. You may notice some differences in Benjamin's facial features from the original. There were a couple of issues with the side profile which made the front not line up properly so I went in and fixed most of the problems. The colour was something I thought worked but the ladies will be texturing I think...

Monday, 30 December 2013

Pre-Production: Skeleton Turnarounds (Anatomical Frames)

Hello Everyone,

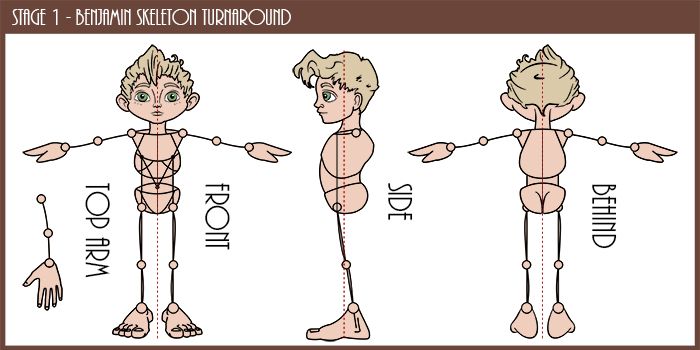
As I said previously I have a bit of a back log of posts so you will probably see a couple of little flurry's like these two today. Possible a third a little later. These are where I'm kind of trying to do things in an order to demonstrate the process. Sometimes I dip in and dip out of areas of creativity like if I've been modelling all day Ill go and do some drawing in the middle to give my eyes a rest. I also find this refreshes me for when I hit a wall or find no solution to a problem. Anyway these skeletons are the framework for the final turnarounds which will be used for the characters.

I have already begun the modelling process so this is really me catching up with myself. I use these frames to block in a form mostly to make sure the body holds weight and has the an S curve flow throughout the form. My turnarounds of the past have mainly been a little static and that is mainly because we don't consider the weight of the flesh and how that interacts with the bones. Characters can quickly look rigid if the body isn't holding any weight. I also realise that these skeletons are more for orthographic view so some details have to be flattened (the feet for example).

Anyway lets take a look at my skeleton frameworks!


The image above shows the skeleton forms worked out from Sammy's original head sketches and my early proportion/skeleton tests. I have defined the joints as that is where distortion lies if it were not for these we would be blobs. I have a top arm separate for modelling the hand and the muscles of the arm. The side is where one notices the S curve from the central line. The chest sticks out leading into the pelvis Benjamin's body is like a bean which I know from the earlier form tests we conducted... He looks a little older then we had considered but this is just the earlier test.

Pre-Production: Phil.. I mean Bernard Expression Sheets

Hello Everyone,

I have a chain of posts backing up I am just trying to get everything ready in the right order here. I have one model totally made and completely UV Mapped I just have to find the right moment to post it up. The posts that will follow will be more epic but I have to get the skeleton turnarounds posted and the final turnarounds I used. Of course there have been a couple of delays here and there but I am aiming to have all of this final 2D stuff out of the way so I can fill this blog with 3D bliss. Sammy and Chrissie have been patient but if everything goes to plan we should be okay by next week!

For those of you that do not know next week is the deadline for our minor project which is when I am aiming to have 4 complete character models ready for rigging and eventually production. Obviously I have a couple of questions for Alan when we return before going into Rigging mode but I'm hoping any issues will be minor. I thought I would conclude the expression sheet array with the last of our 4 characters "Bernard" which is Barnabas's dad. I have been told to prioritise his miserable side due to our narrative but I couldn't resist doing a couple that shows he isn't always a grumpy gus!

So lets get down to my final array of expression sheets... you know him as "Phil"... whoops I mean "Bernard".


I kept most of Bernard's expressions to the darker tones but I did break free from it which gave me time to explore some of his other facial activities. "Annoyed" and "Angry" were directly what Chrissie and Sammy saw so I indulged my "Thinking" expression. I actually think this one goes across all of the characters. After you do the basic emotions its hard to knock down more, I wanted to fulfil the 12 expression quota. Of course Alan and many like you will probably call me crazy and this is unnecessary but I liked to do it... If anything it made the others more explorative.